Getting Started
Overview
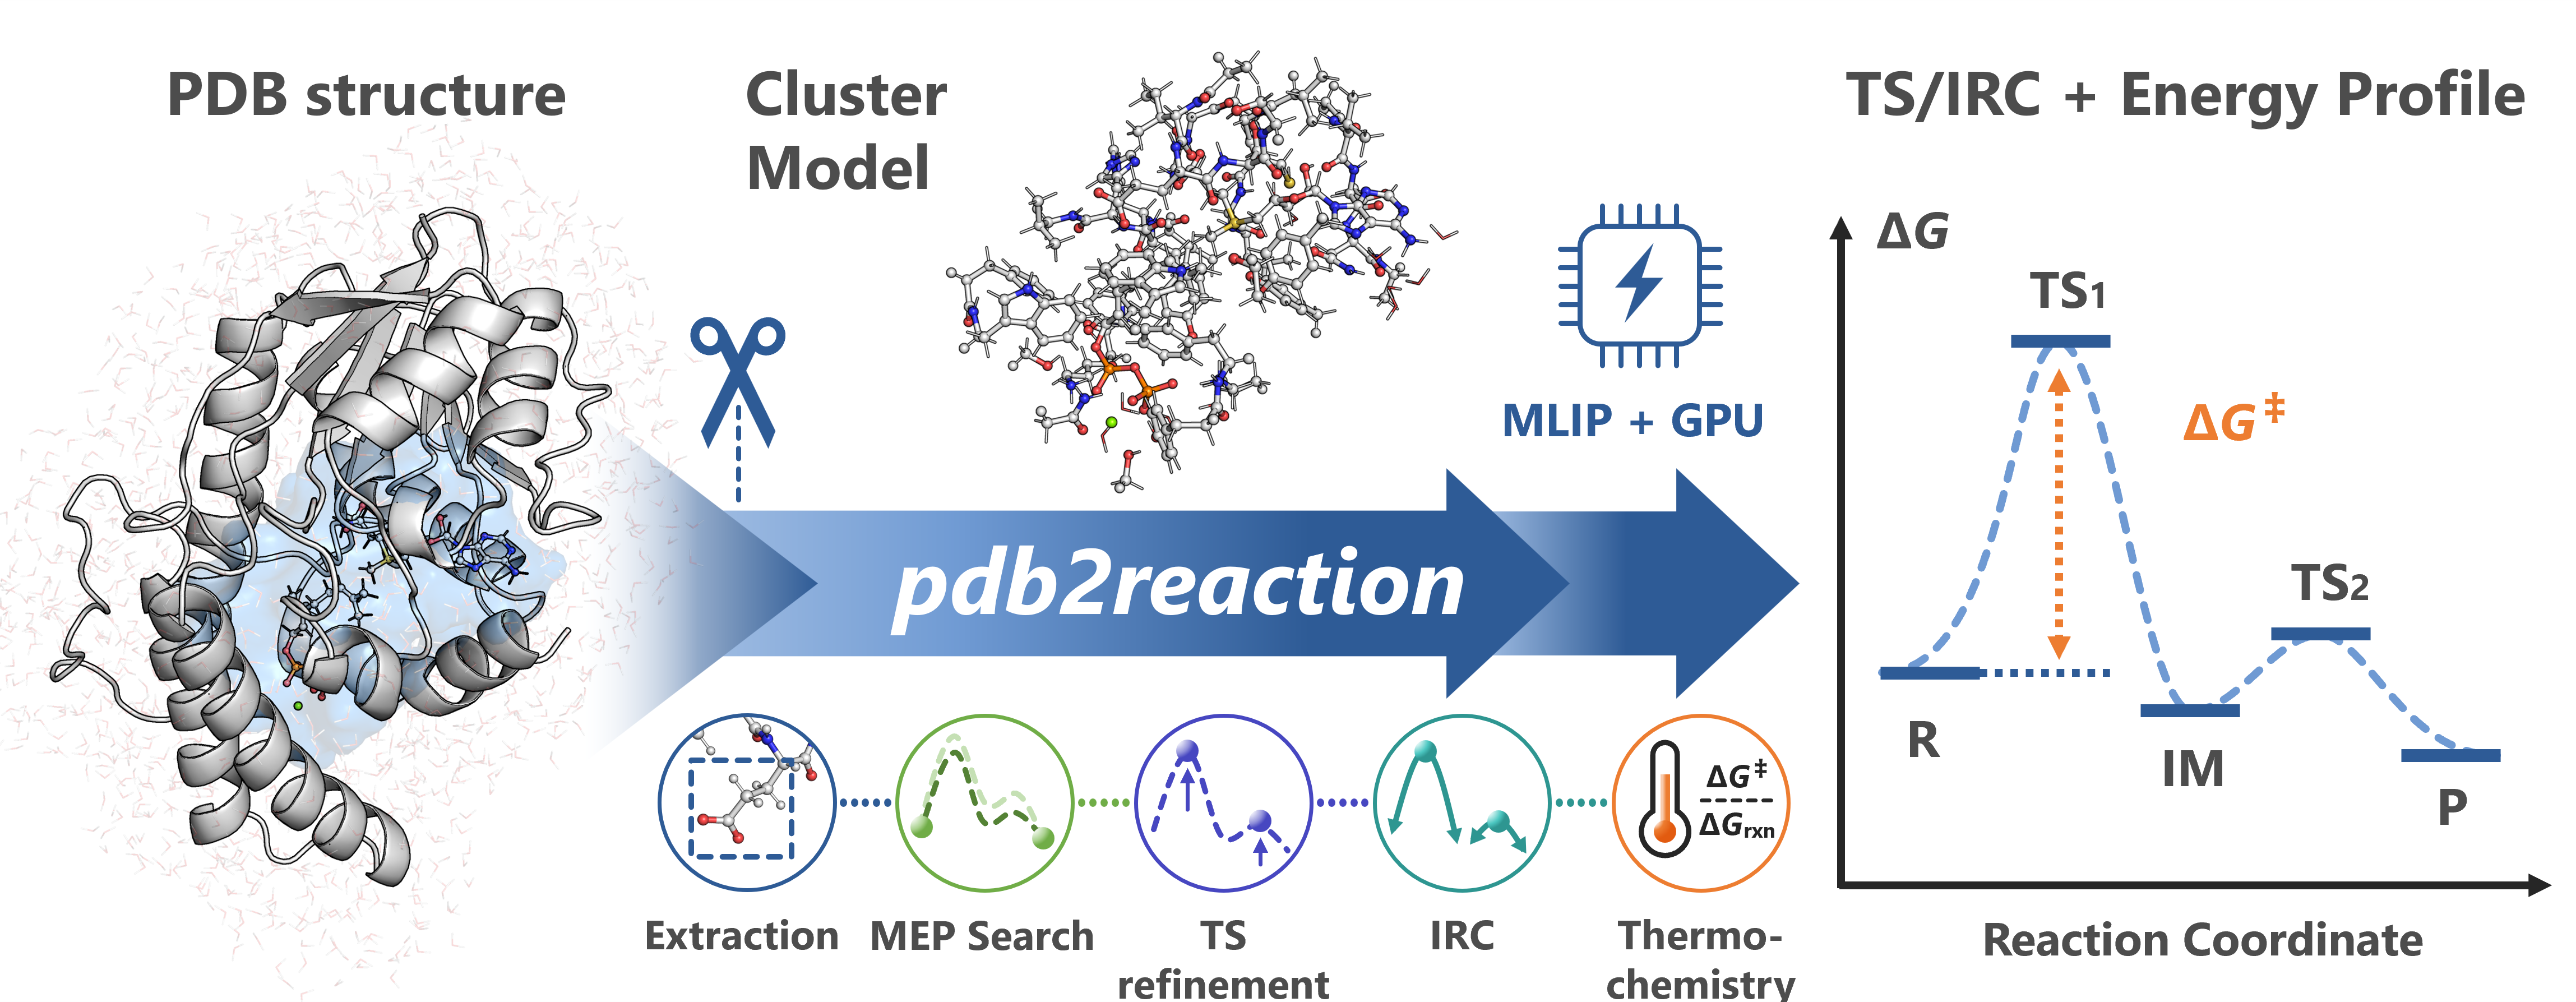
pdb2reaction is a Python CLI for elucidating enzymatic reaction pathways from PDB structures using machine-learning interatomic potentials (MLIPs). The default backend is Meta’s UMA; orb, mace, and aimnet2 are also supported via -b/--backend. Foundation-model MLIPs make cluster-model TS optimization, IRC verification, and QRRHO thermochemistry tractable on a single GPU — cutting the DFT-bound cost that previously limited mechanistic screening.
A single command generates a reasonable initial reaction path:
pdb2reaction -i 1.R.pdb 3.P.pdb -c 'SAM,GPP,MG' -l 'SAM:1,GPP:-3'                       # MEP only
pdb2reaction -i 1.R.pdb 3.P.pdb -c 'SAM,GPP,MG' -l 'SAM:1,GPP:-3' --tsopt --thermo --dft   # full
Given (i) ≥ 2 PDBs (R → … → P), (ii) one PDB with --scan-lists/-s, or (iii) one TS candidate with --tsopt, pdb2reaction extracts an active-site cluster model, runs an MEP search (GSM / DMF), and optionally chains TS optimization, IRC, thermochemical correction, and single-point DFT. The same pipeline also runs without active-site extraction: pass a small molecule as .xyz / .gjf (set the net charge with -q), or a cluster model you built yourself as a PDB — omit -c/--center in either case and the structure is analyzed as given.
Working examples (BezA C6-methyltransferase, both multi-structure MEP and scan modes): examples/. For setup see Installation; for symptom-first diagnosis see Common Error Recipes and Troubleshooting.
Pipeline (the all subcommand)
PDB(s) → [extract] → [scan] (optional, --scan-lists) → [path-opt] (MEP) → [tsopt] → [irc] → [freq] → [dft] (optional)
Each stage is also a standalone subcommand; all orchestrates them and writes unified summary.json + summary.log.
Key output files
File |
Description |
|---|---|
|
Machine-readable results (barriers, energies, bond changes, environment) |
|
Human-readable text summary with directory tree |
|
IRC-optimized R/TS/P structures per reaction step |
|
Merged MEP trajectory (PyMOL / VMD) |
|
Energy profile plots (electronic / Gibbs-corrected) |
Important
Input PDBs must already contain hydrogen atoms.
When you provide multiple PDBs, they must contain the same atoms in the same order (only coordinates may differ).
CLI conventions
Convention |
Example |
Notes |
|---|---|---|
Residue selectors |
|
Quote multi-value strings. |
Charge mapping |
|
Colon separates name and charge; comma separates entries. |
Atom selectors |
|
Delimiters: space / comma / slash / backtick / backslash. |
Full table: CLI Conventions.
Hydrogen addition (if your PDB lacks H)
reduce input.pdb > out.pdb (fast, crystallographic structures) · pdb2pqr --ff=AMBER input.pdb out.pqr (also assigns partial charges) · obabel input.pdb -O out.pdb -h (general cheminformatics) · PyMOL h_add · AmberTools tleap (Amber force-field prep). Apply the same tool with consistent settings to every input to keep atom order matched across structures.
Quickstart routes
Quickstart:
pdb2reaction all— multi-structure MEPQuickstart: single-structure staged scan — one PDB +
--scan-listsQuickstart: TS-only mode —
pdb2reaction all --tsopt
Command line basics
The CLI entry point is pdb2reaction (alias p2r; both register from the same setuptools entry point). The default subcommand is all:
pdb2reaction [OPTIONS]... # equivalent to: pdb2reaction all [OPTIONS]...
Two key options on the workflows that use cluster extraction:
-i/--input— one or more full structures (reactant, intermediate(s), product).-c/--center— substrate / extraction center (residue names, residue IDs, or PDB paths). Omit to skip extraction and feed the full input structure directly.
Main workflow modes
Mode |
Trigger |
Use when |
Quickstart |
|---|---|---|---|
Multi-structure MEP |
|
You have ≥ 2 endpoints / intermediates. |
|
Staged scan |
|
You’d rather define the reaction coordinates than provide endpoints. |
|
TS-only |
|
You already have a TS guess. |
Important
Single-input runs require either --scan-lists/-s or --tsopt — a bare -i ONE.pdb will not trigger a full workflow.
Common options
Option |
Description |
|---|---|
|
Input structures. ≥ 2 PDBs → MEP; 1 PDB + |
|
Substrate / extraction center (residue names, residue IDs, or PDB paths). |
|
Charge mapping ( |
|
Net system charge / spin multiplicity. |
|
TS optimization + IRC / vibrational analysis / single-point DFT. |
|
MLIP backend (default |
Full option matrix: CLI Conventions and the generated CLI reference under reference/commands/index. Backend cost / VRAM comparison: see Troubleshooting › Choosing a backend.
Run summaries
Every pdb2reaction all run writes summary.log (human) + summary.json (machine) with the CLI command, global MEP statistics, per-segment barriers / bond changes, and MLIP / thermo / DFT energies (when enabled). Each segments/seg_NN/ carries its own per-stage summaries.
HPC / multi-GPU
pdb2reaction parallelizes UMA inference across nodes — set workers and workers_per_node to enable multi-worker mode. Job-script templates: docs/hpc-example.md. Backend configuration: MLIP Calculator.
Agent Skills
pdb2reaction ships agent-readable instructions under skills/ — copy into your project as .claude/skills/ (or ~/.claude/skills/ for user-global) to let Claude Code / Cursor / OpenCode drive the CLI end-to-end.
Getting help
pdb2reaction <subcommand> --help               # core options
pdb2reaction <subcommand> --help-advanced      # full option set
--help-advanced is available on the calculation / scan / extract / utility commands; for the per-command index see the documentation home.